Appearance
Set Up an Agency Workspace
To unlock the Agency Plan's multi-brand capabilities, configure your workspace for team collaboration and multi-client content delivery.
In Brande.ai, an agency workspace is built one brand at a time — each client is its own brand record, with its own Brand DNA, voices, reference materials, and integrations. There is no separate agency-level configuration object; instead, the same /onboard wizard is reused for every brand you create.
Prerequisites
- Upgrade to the Agency Plan (Account sidebar > My Plan > select Agency Plan)
- At least one team member invited to your workspace (optional for solo agencies)
- First brand already created (you get one default brand on signup)
Step 1: Understand Your Initial Setup
When you sign up, Brande.ai creates one default brand for you. This is your workspace's first brand.
Check it: Click your profile icon (top right) > Brands dropdown. You see your default brand with a crown icon (indicates you own it).
This is your starting point.
Step 2: Create Client Brands
For each new client, create a new brand.
Option A: From the Brands Dropdown
- Click your profile icon (top right)
- In the Brands dropdown, click the + button
- Enter the client's brand name
- Click Create Brand
- You are automatically switched to the new brand
Option B: From Account Sidebar
- Click Account (Ctrl/Alt+A or via profile dropdown)
- In the Account sidebar, click Brands list section (if visible)
- Click Create New Brand or + button
- Enter the client's brand name
- Click Create Brand
The new brand now appears in your Brands dropdown with a crown icon.
Step 3: Configure Each Client's Brand DNA
For each client brand you create:
Switch to that brand (click profile icon > select brand from dropdown)
Open Account sidebar (Ctrl/Alt+A)
Click Brand Profile in the sidebar
Complete the Brand Profile onboarding:
- Brand Basics — Brand name, company stage, logo, business category
- Business Objectives — 2-3 measurable outcomes for the next 6-12 months
- Audience & Triggers — Target customer and what drives them to buy
- Content Channels — Where they publish (Blog, LinkedIn, Email, etc.)
- Brand Voice & Assets — Examples of their actual content and voice
Click Analyze when you add text, file, or media examples
Review the analysis and click Save Analysis
Click Save to finalize the Brand Profile
Repeat this for every client brand. Each new brand is created at /brand/create (name + logo) and immediately routed into /onboard to collect Brand DNA. The Brand Profile page edits name and logo only — use the onboarding wizard whenever you need to update full Brand DNA.
Step 4: Set Up Team Access
Invite your team members to the brands they'll work on.
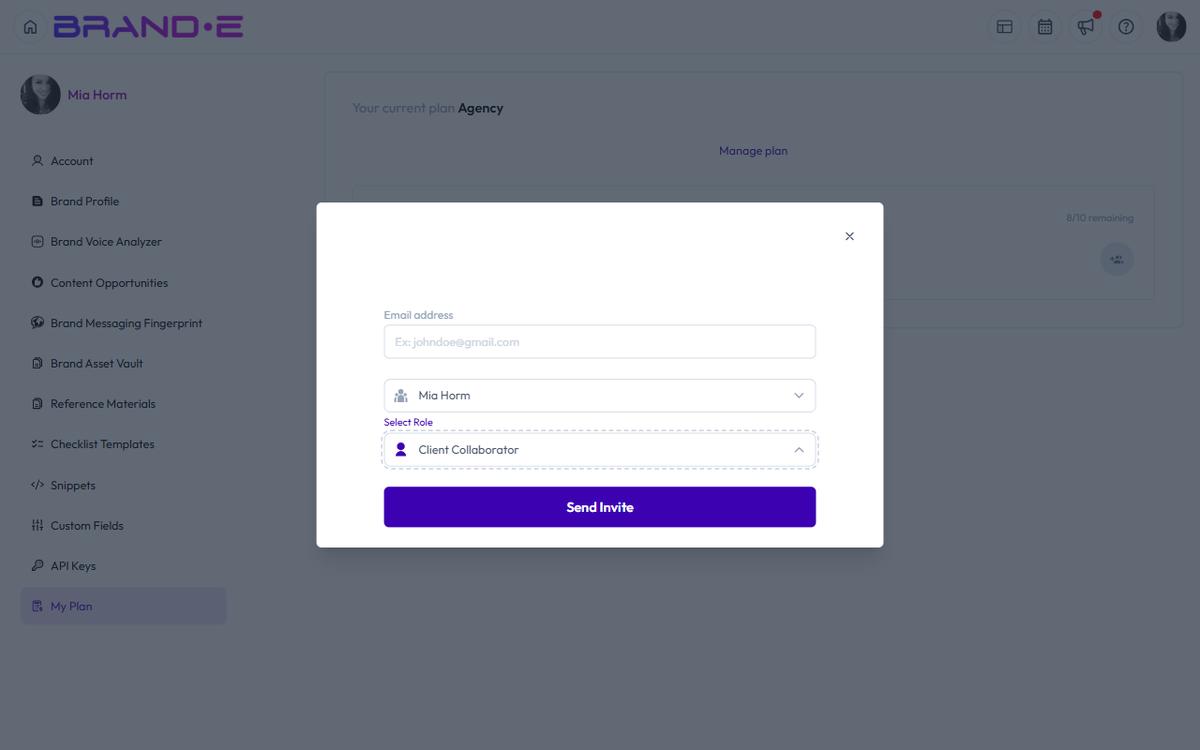
- Click profile icon (top right)
- Click Invite (or see Invite modal from Account sidebar)
- Enter team member's email address (field shows "Ex: johndoe@gmail.com")
- Select the Brand dropdown — choose which client brand(s) to invite them to
- Select Role — choose Agency Admin (full access) or Client Collaborator (read-only, approval only)
- Click Send Invite
Success: "{email} has been invited to {brand name}"
Team members receive an email invite and can join that brand immediately upon clicking the link. The Invite dialog accepts one brand per invite — to add the same person to multiple brands, send a separate invite per brand.
Step 5: Configure Checklists and Workflows
Checklist Templates live in your Account sidebar and apply across all brands.
- Open Account sidebar (Ctrl/Alt+A)
- Click Checklist Templates
- Click Create New Template
- Name the template (e.g., "Client Approval Checklist")
- Add steps:
- "Brand DNA review — ensure voice matches Brand Profile"
- "Client collaborator approval — wait for sign-off"
- "Final fact-check — verify claims and claims sources"
- "Publish to client's channels"
- Click Save Template
Important: checklist templates are scoped per-brand, not workspace-wide. Templates created while you have Brand A selected only appear in Brand A's project Tasks dialog. Re-create the template under each brand that needs it, or treat templates as part of each client's setup checklist.
Step 6: Verify Multi-Brand Setup
Test that your workspace is configured correctly:
- Click profile icon > switch to Client A brand
- Go to dashboard — see Client A's projects and Content Agent recommendations
- Click profile icon > switch to Client B brand
- Go to dashboard — see Client B's projects and recommendations (completely different)
- Invite a team member to Client A only
- Log in as that team member — they only see Client A brand in dropdown
- Log back in as agency owner — you see both brands
Your Agency Plan workspace is ready.
Common Setup Patterns
Solo Agency (You + Fractional Team)
- Create one brand per client
- Invite contract content writers to specific client brands only
- Use Checklist Templates to enforce your service delivery process
- You review all work before client approval
Agency Team (3-5 Team Members)
- Create one brand per client
- Assign team members by role:
- Content Strategist — invite to 3-4 client brands (full access)
- Content Creator — invite to 2-3 brands, limited to project creation only
- Designer/Strategist — invite to all brands (full access)
- Use approval workflows for client review
- Use Checklist Templates to coordinate across team
White-Label Service
- Create one brand per client
- Invite only selected team members (strategists, not creators)
- Invite client stakeholders with read-only access and approval rights
- Brande.ai appears as your service delivery platform (not a tool your clients use)
Troubleshooting
Q: I created a brand but can't see it in the dropdown. A: Make sure you're logged in and the page has refreshed. Brands appear in the dropdown immediately after creation.
Q: I invited a team member but they don't see the brand. A: Check that the invite was sent to the correct brand in the invite modal. Resend if needed. Check their spam folder for the invite email.
Q: Can I rename a brand after creation? A: Yes. Open the brand from the brand switcher, go to its Brand Profile, and update the name (and logo if needed). The change saves to the brand record and propagates everywhere the brand name is shown.