Appearance
Navigate Settings and Preferences
Your account settings and preferences control how you work in Brande.ai.
Everything lives in one place: your Account page, accessible with a single keyboard shortcut or click.
Access Account Settings
Option A: Profile Dropdown (Fastest)
- Click your profile icon (top right corner of the screen)
- Select Account from the dropdown menu
- Account page loads
Option B: Sidebar Navigation
- Open the sidebar (Alt+S or Ctrl+S on Mac, or click menu icon)
- Look for Account link (usually near the top)
- Click to navigate to Account page
Account Page Structure
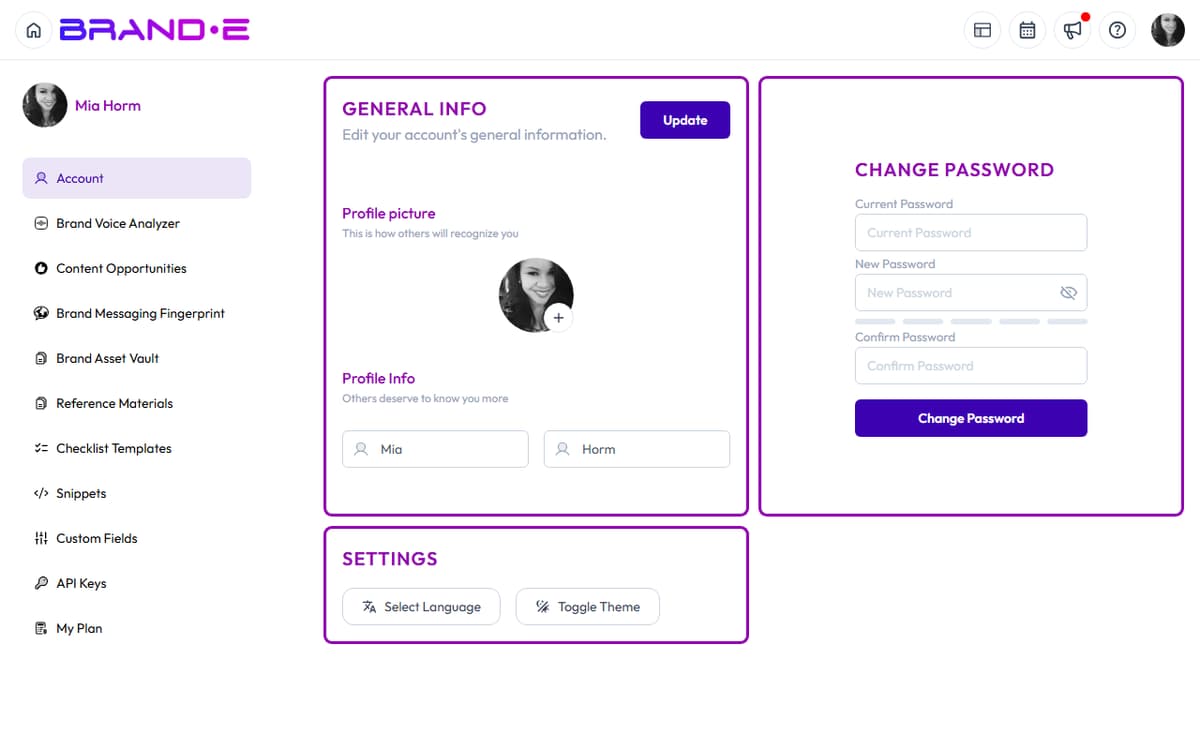
The Account page displays your settings in a sidebar menu on the left and the main content on the right.
Account Sidebar Navigation
The left sidebar lists all account sections:
General
- Account (or "General Info") — Profile picture, first name, last name, update button
- Brands — List of brands you own or have access to
- My Plan — Your current subscription and upgrade options
Brand Settings (Brand-Specific) These change when you switch brands (using the profile dropdown):
- Brand Profile — Edit your Brand DNA
- Brand Voice — Create and manage voice profiles
- Content Opportunities — View Content Agent recommendations
- Brand Messaging Framework — Configure messaging for your brand
- Brand Materials — Store brand assets and guidelines
- Content Reference — Store reference materials and examples
- Checklist Templates — Create reusable checklists (workspace-wide)
- Snippets — Create reusable text blocks
- Custom Fields — Configure project metadata for your brand
- API Keys — Create and manage API keys (workspace-wide)
Workspace Settings
- Settings — Language, theme, and other workspace preferences
General Account Info
Navigate to Account > Account (or General Info).
Displays your profile settings:
Profile Picture Upload a profile picture (image file) that appears next to your name in comments, approvals, and team interactions.
Click the picture area to upload a new image or delete the current one.
First Name Your first name as it appears in your profile and to team members.
Last Name Your last name as it appears in your profile.
Update Button After editing any of the above, click Update to save changes.
Success message: "Profile updated successfully"
Change Password
On the Account page, locate the Change Password section (or similar).
Current Password field Enter your current password for security verification.
New Password field Enter your new password (must be different from current password).
Confirm Password field Re-enter your new password to confirm.
Validation rule: "Password must match"
Click Submit to save your new password.
Success message: "Password changed successfully"
Next time you log in, use your new password.
Theme and Language Preferences
Navigate to Account > Settings (or Preferences).
Language Selection
A Language dropdown displays available languages with flag icons:
- EN (flag icon) — English
- ES (flag icon) — Español (Spanish)
Select your preferred language. The entire interface switches language immediately:
- All UI labels, buttons, and menu items
- Documentation links (if available in that language)
- Dates and number formatting
Your selection is saved and persists across sessions.
Toggle Theme
A Toggle Theme button switches between light and dark mode:
- Light Mode — White background, dark text (default)
- Dark Mode — Dark background, light text
Click the button to toggle. Your selection is saved automatically.
Your theme preference appears in:
- All pages and sections
- Editor background
- Sidebars and modals
- Calendar views
Why use dark mode:
- Reduces eye strain in low-light environments
- Some users find it aesthetically preferable
- Can improve battery life on OLED screens
Managing Brands
Navigate to Account > Brands to see all brands you own or have access to.
For each brand, you see:
- Brand name
- Crown icon (if you own it)
- Role (Owner, Brand Collaborator, or Client Collaborator)
- Switch-brand action
Brand profile editing lives at Brand Profile (with adjacent pages for Brand Voice Analyzer, Brand Asset Vault, Brand Messaging Fingerprint, and Reference Materials). To request a brand new workspace, use the Request New Brand Workspace modal in the help menu — it opens an Asana form. There is no in-app brand-delete action; contact support if you need to remove a brand.
My Plan
Navigate to Account > My Plan to view your subscription.
Displays:
- Current Plan — Starter, Pro, Agency, or Trial
- Renewal Date — When your subscription renews
- Features Included — What's available at your plan level
- Upgrade Button — Click to upgrade to a higher plan
- Manage Billing — Update payment method, view invoices
Check this page if you're hitting plan limits (e.g., "You've reached your project limit for this month").
Brand Profile
Navigate to Account > Brand Profile to edit your Brand DNA.
This section is brand-specific. Switching brands changes which Brand Profile you see.
Contains:
- Brand Basics (name, stage, logo, category)
- Business Objectives (what you're trying to achieve)
- Audience & Triggers (who you're targeting)
- Content Channels (where you publish)
- Brand Voice & Assets (examples of your communication style)
See Complete Your Brand Profile Step by Step for detailed guidance.
Brand Voice
Navigate to Account > Brand Voice to create voice profiles.
If you manage multiple tones or personas within one brand, create separate voice profiles here. For example:
- "Professional" — Formal, B2B tone
- "Casual" — Friendly, conversational tone
- "Educational" — Teaching-focused, instructional tone
Each voice is brand-specific.
Content Opportunities
Navigate to Account > Content Opportunities to view all Content Agent recommendations for the current brand.
Displays:
- All past and pending recommendations
- Status (Pending, Done)
- Regenerate button to force new recommendations
- Pagination (10 recommendations per page)
Snippets
Navigate to Account > Snippets to create and manage reusable text blocks.
A snippet is text you use repeatedly (CTAs, sign-offs, disclaimers, standard messaging).
Create snippets here and insert them into projects to save time and maintain consistency.
Snippets are brand-specific.
Custom Fields
Navigate to Account > Custom Fields to configure project metadata.
If you need to track additional information on projects (for example, "Client Name", "Campaign Type", "Approval Status"), create custom fields here.
Custom fields appear on all projects for this brand. The page heading is Custom Fields, the entry point uses the dashed empty-state pill Add custom fields, and the create dialog itself is titled Add Custom Field with a Create Field primary button. Field types include text, number, URL, date, single-select, multi-select, and checkbox.
API Keys
Navigate to Account > API Keys to create and manage API keys for integrations.
New API Key Form
- Key Name field (e.g., "Zapier Production")
- Create Key button
Click Create Key to generate a new API key.
The key is displayed once. Copy it immediately—you won't see it again.
API Key List Shows all your keys with:
- Key name
- Last used date
- Created date
- Revoke button to deactivate the key
Use API keys to authenticate third-party integrations such as Zapier and Make.
There is no dedicated Zapier integration in Brande.ai — Zapier and Make consume the keys you create here. The settings sidebar surfaces a Zapier link labelled Unlock/Connect 8000+ Brande.ai Integrations with Zapier! that points at the public Brande.ai Zapier app.
Checklist Templates
Navigate to Account > Checklist Templates to create workspace-wide checklists.
Unlike brand-specific settings, checklists apply across all your brands.
See Create Custom Content Checklists and Workflows for detailed guidance on creating and managing checklists.
Settings (Workspace Preferences)
Navigate to Account > Settings for workspace-level preferences.
Contains:
- Language — Select EN (English) or ES (Spanish)
- Toggle Theme — Switch between light and dark mode
These are the only workspace-level preferences in the current build. There is no email-notification toggle, default timezone, or DND configuration.
Profile Dropdown Menu
Click your profile icon (top right) to access a quick menu:
User Info Your name and profile picture
Notifications Icon showing unread notification count. Click to view notifications.
Account Jump to Account page (Ctrl/Alt+A)
Brands Dropdown list of brands you own or have access to. Click to switch.
Keyboard Shortcuts View the keyboard shortcuts reference modal.
Logout Sign out of Brande.ai.
Troubleshooting
Q: I changed my language but the interface is still in English. A: Refresh your browser. Language changes take effect after a page reload.
Q: I can't find the Settings page. A: Look in the Account sidebar for "Settings" or "Preferences". It's typically near the bottom of the sidebar.
Q: How do I delete my account? A: There is no in-app account-delete action. Contact support via /support and request account closure.
Q: Can I change my email address? A: Email changes aren't exposed in account settings today. Submit a support ticket with the new address and a confirmation request.